Unlock the Secrets of Professional Podcast Audio with Pro Tools Pro Tips
![]() Damian Moore, Last updated: 15 October 2024
Damian Moore, Last updated: 15 October 2024
Pro Tools has gained immense popularity for mastering podcasts due to its exceptional features and functionalities that cater specifically to audio professionals and podcast creators. As one of the industry’s leading digital audio workstations (DAW), Pro Tools offers a comprehensive software suite that allows users to edit, mix, and enhance audio with unparalleled precision and control. Its intuitive interface and user-friendly layout make it accessible to both beginners and seasoned professionals, ensuring a seamless workflow throughout the mastering process. Pro Tools boasts a wide range of high-quality plugins and effects, enabling users to enhance the clarity, warmth, and overall quality of podcast audio. Additionally, its advanced editing capabilities allow for seamless editing and correction of any imperfections, ensuring a polished and professional end product. With its long-standing reputation in the audio industry and a vast community of users, Pro Tools has become the go-to choice for podcast creators aiming to achieve top-notch audio quality that captivates their audience’s ears and enhances their overall podcasting experience.
This guide will take you through some of the biggest improvements you can make, and give listeners to your shows a way better experience.
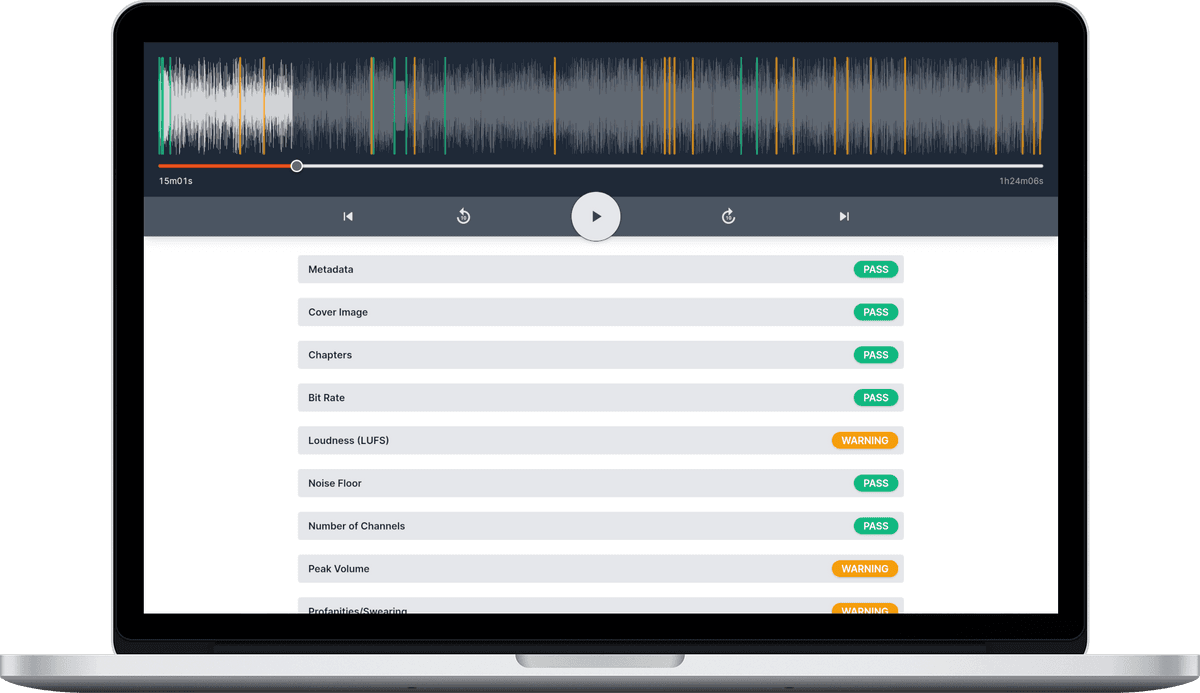
If you’re not sure which of the following apply to you, create an Audio Audit account, upload your audio and have it checked automatically in just a few minutes for free.
Loudness and peak volume
Platforms like Apple Podcasts define standards for how loud podcasts should be relative to each other. By adhering to loudness standards you are protecting your listeners’ hearing and ensuring a consistent and pleasant experience. Setting loudness correctly is especially important for podcasters due to the fact that most people are listening to podcasts with headphones/earbuds and often the volume has to be louder to compensate for noisy environments. Failing to set your loudness appropriately could also trigger some players to compress your audio, adding artifacts.
LUFS (also known as LKFS) is a way of measuring average audio levels using the decibel (dB) scale. There have been several mechanisms used to gauge the loudness of an audio track over the years. Just taking the “True Peak” value is not representative and is easily biassed, RMS (Root Mean Square) is better as it averages over the time period but is still heavily influenced by things like gaps of silence. LUFS goes a step further and aims to represent loudness in a way that humans perceive it. It has been adopted across TV, film, music, and radio stations for many decades now.
Apple is the dominant authority when it comes to podcast standards and recommends a target of “-16 dB LKFS [LUFS], with a +/- 1 dB tolerance”. Factoring in the tolerance, our recommended range is -17 to -15 LUFS.
Youlean Loudness Meter is a popular extension that shows the loudness values of different time periods and highlights in red when you go over your set limit. There is a free version that probably does what you want as long as you don’t mind setting the values manually.

The popular iZotope RX plugin has a method for normalizing the LUFS value during mastering. It’s overkill if LUFS control is all you’re going to use it for but you might be interested in other parts of their toolkit for enhancing audio.

Sample rate, sample width, and bit rate
You should become familiar with what these terms mean. We have explainer articles (linked) which dig into the theory:
Generally sample rate and sample width need to be set high enough for the start before you record. All three can be tweaked (and experimented with) when you come to the final export.
Either 44100 Hz or 48000 Hz sample rate are fine. 16bit sample width is ideal though you can edit at a higher rate and just set this value before export.
From the menu, select Setup > Session to get to this window where you can make adjustments.

For bit rate, 128 kbps or 256 kbps MP3 is recommended as a happy medium between quality for file size. For most podcasts, if there is only light use of audio as intros, soundscapes, etc. the 128 kbps is recommended. Shows for example that are heavily critiquing music will probably want to choose 256 kbps. MP3 is still the dominant format to maintain compatibility with all publishers, platforms and players.
To export from Pro Tools, from the main menu select File > Bounce to > Disk… which will open a dialogue window.
 dialog")
Metadata, cover images and chapters
Audio file metadata allows you to include text tags along with the audio data. Common types of tag are “title”, “album”, “artist”, “track number”, “year” and “copyright”. These tags are displayed by almost all media player software/apps. We recommend giving each episode at least a title, album name (podcast), artist name and track number (episode/show number).
Other more advanced forms of metadata are cover images and chapters. Hopefully most of your listeners are subscribed to your podcast RSS feed through a podcast player app and will get the image file referenced in the feed. However some people download episode MP3s from the website or share files directly with others. For this reason you should always embed the cover image in the audio file as well. Some podcasts also like to create new artwork for each episode. Chapter markers help listeners by showing which section of the episode they are currently on and allowing them to navigate to a particular part they are interested in. Some listeners like chapter marks as it lets them skip past intro music and advertisements but it has other uses that could work well for your specific podcast content.
We don’t know of any ways of setting these inside Pro Tools but there are several tools you can use to add metadata after export (whilst not touching the audio part of the file). Here are our dedicated guides:
Silences
It is sensible to keep a small amount of silence right at the start of your audio track rather than having instant sound. This is less surprising to the listener but also there can be a split second of initiation time just after the listener presses the play button. It also makes sense to give listeners an audio cue that they have reached the end of an episode and a small break before the next episode in their queue starts. It’s kind of like how in the world of graphic design it is important to give your content some “white space” to let it breathe.
We use ACX as a source of reference for selecting this range. They are a large publishing platform for getting audiobooks into various stores. There weren’t any podcast-specific standards we could find. Based on this we suggest between 0.5 and 1 seconds of silence (or “room tone”) at the start and between 1 and 5 seconds of silence at the end. For this measurement we consider silence as anything below a threshold of -40 dB.
Channels
This section is about whether you should edit (and publish) in mono or stereo. Most music we listen to is in stereo as it’s designed to be played on a pair of speakers or a pair of headphones. Most podcast listeners are using headphones so could benefit from a strong stereo experience.
Even if your show isn’t heavy on the music, discussions can be easier to listen to and comprehend if the recordings from each participant are panned to a different position very slightly to the left or right. This works because the listener gets an innate spatial model of where people are and can tell them apart more easily, even if they have similar voices.
You may think being in stereo would make your file size twice as large as mono. This really isn’t the case though, and you might notice only a small increase in file size. This is especially true if you use the “joint stereo” mode of compression as this uses differencing between the two channels which is very effective with panning as described above.
Summary
I hope you learned something useful in these Pro Tools tips. We have lots of other articles about producing great podcasts and AI tools developed to improve your workflow. If you have any feedback, please do get in touch.
—
Header image courtesy of Techivation