Mastering Podcast Audio: A Comprehensive Guide for Reaper Users
![]() Damian Moore, Last updated: 14 October 2024
Damian Moore, Last updated: 14 October 2024
Reaper has emerged as a go-to choice for podcast creators seeking professional-grade audio without the premium price tag. This digital audio workstation (DAW) offers a treasure trove of features and capabilities that can help you sculpt your podcast audio into a polished masterpiece. In this guide, we’ll delve into the world of podcast production with Reaper, providing you with the insights and tools necessary to create captivating content.
This guide will show you some of the most important improvements you can make, and give listeners to your shows a much better experience.
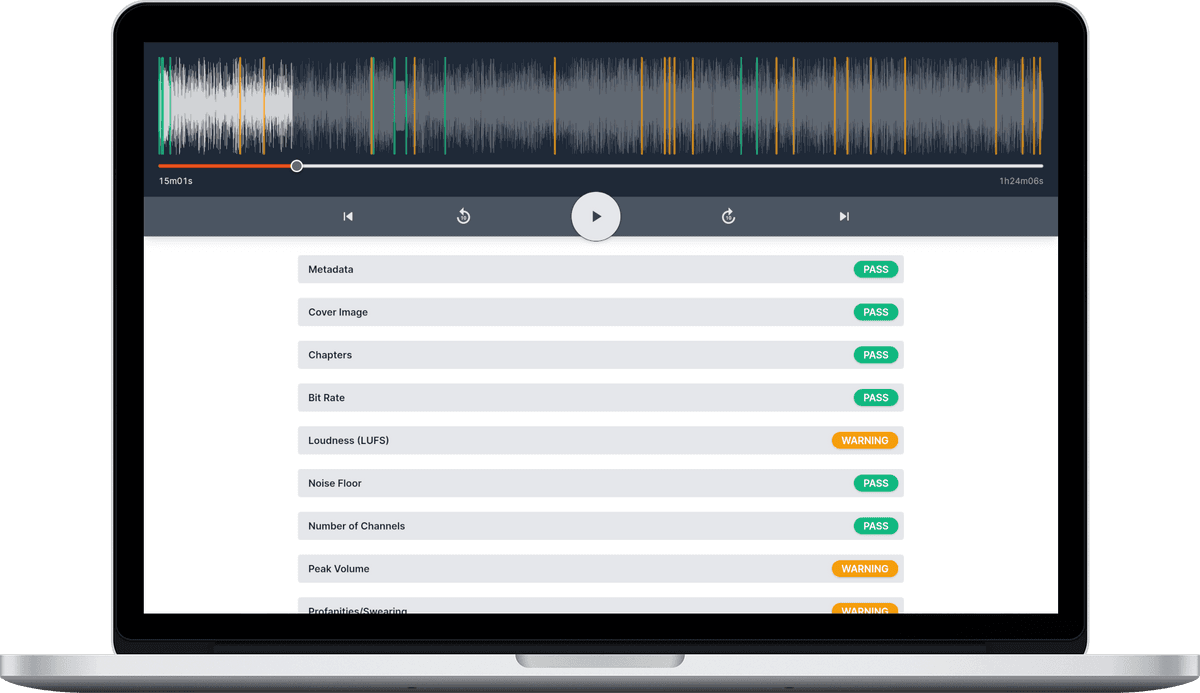
If you’re not sure which of the following apply to you, create an Audio Audit account, upload your audio and have it checked automatically in just a few minutes for free.
Loudness and Peak Volume
Platforms like Apple Podcasts define standards for how loud podcasts should be relative to each other. By adhering to loudness standards you are protecting your listeners’ hearing and ensuring a consistent and pleasant experience. Setting loudness correctly is especially important for podcasters due to the fact that most people are listening to podcasts with headphones/earbuds and often the volume has to be louder to compensate for noisy environments. Failing to set your loudness appropriately could also trigger some players to compress your audio, adding artifacts.
LUFS (also known as LKFS) is a way of measuring average audio levels using the decibel (dB) scale. There have been several mechanisms used to gauge the loudness of an audio track over the years. Just taking the “True Peak” value is not representative and is easily biassed, RMS (Root Mean Square) is better as it averages over the time period but is still heavily influenced by things like gaps of silence. LUFS goes a step further and aims to represent loudness in a way that humans perceive it. It has been adopted across TV, film, music, and radio stations for many decades now.
Apple is the dominant authority when it comes to podcast standards and recommends a target of “-16 dB LKFS [LUFS], with a +/- 1 dB tolerance”. Factoring in the tolerance, our recommended range is -17 to -15 LUFS.
Reaper empowers you to achieve the desired loudness levels with ease — everything you need is built-in.
- Firstly select the tracks you wish to normalize.
- Right click on a selected track to open the context menu and then select Item processing > Normalize items (Peak/RMS/LUFS)….
- In the dialog window you have some options. Assuming you’ve already done any manual adjustment you need, choose Normalize to: LUFS-I, -16 dB and Normalize items together (common gain). The “I” in LUFS-I stands for “Integrated” meaning it analyzes the whole mix/master rather than a smaller sliding window.


Sample rate, sample width, and bit rate
You should become familiar with what these terms mean. We have explainer articles (linked) which dig into the theory:
Generally sample rate and sample width need to be set high enough for the start before you record. All three can be tweaked (and experimented with) when you come to the final export.
Either 44100 Hz or 48000 Hz sample rate are fine. 16bit sample width is ideal though you can edit at a higher rate and just set this value before export.
If you are recording from inside Reaper you’ll want to go to Reaper Preferences and set your audio device input sample rate and sample rate correctly. Sample rate is most important here as it can’t be adjusted without adding distortion. It may be preferable to record and edit at a higher sample width and reduce to 16bit before export.
To control the export settings go to File > Render to launch the Render to file dialog. About 2 thirds of the way down under the Primary output format tab with Format: MP3 (encoder by LAME project) selected you will be able to select Bitrate from the select box (128 kbps recommended). Variable bitrate (VBR) is usually preferable.
Metadata, Cover Images, and Chapters
Audio file metadata allows you to include extra information alongside the audio data. Common types of tag are “title”, “album”, “artist”, “track number”, “year” and “copyright”. These tags are displayed by almost all media player software/apps. We recommend giving each episode at least a title, album name (podcast), artist name and track number (episode/show number).
There are more advanced forms of metadata to consider, such as cover images and chapters. While most of your listeners may subscribe to your podcast through an RSS feed via podcast apps, some individuals may download MP3 episodes directly from your website or sharing files with others. To ensure a comprehensive experience for all listeners, it’s advisable to embed the cover image directly into the audio file. Additionally, some podcasts opt for creating distinct artwork for each episode. Chapter markers play a crucial role in enhancing the listener experience by indicating the section of the episode they’re currently in and enabling them to navigate to specific points of interest. Beyond simply skipping introductory music and advertisements, chapter markers offer versatile benefits that can enhance your podcast content’s engagement and accessibility.
Since version 6.10 of Reaper, all sorts of metadata export have been added. When you are about to export a file using the Render to File dialog, make sure the Embed: Metadata checkbox is selected and then click the Metadata… button to fill in data. Reaper gives you a lot of options but typically you’ll want ID3 as the metadata format for MP3. There are all sorts of things you can fill in but the main text ones we recommend are:
- Title
- Album name (podcast)
- Artist name
- Track number (episode/show number)
To add a cover image scroll down to Image file (ID: APIC_FILE) and click the Value cell to pick a file from your computer. We have a guide to creating the best cover image but if you are in a hurry this is a good specification for this image:
- 800 × 800 pixels
- JPEG export at 75% quality
- File size less than 0.5MB (500KB)
In this dialog you can also see Chapter (ID: CHAP) for adding your chapters.

Silences
Including a brief moment of silence at the beginning of your audio track is a thoughtful practice. Not only does it avoid surprising the listener with instant sound, but it also accommodates the split-second initiation time that occurs when the listener hits the play button. Moreover, incorporating a subtle audio cue at the end of an episode serves as a signal to your audience that the current episode is concluding, providing a gentle transition before the next episode in their queue begins. This approach is akin to the concept of “white space” in graphic design, allowing your content to breathe and creating a more comfortable and engaging listening experience.
Our reference point for determining these recommended silence durations is ACX, a prominent publishing platform for distributing audiobooks across various online stores. As there is nothing specific to podcasting we rely on ACX’s guidance as a valuable benchmark. As a result, we advise incorporating approximately 0.5 to 1 seconds of silence, often referred to as “room tone,” at the beginning of your podcast. Similarly, at the episode’s conclusion, consider including a duration of silence ranging from 1 to 5 seconds. In our measurement, we designate any audio segment below a threshold of -40 dB as silence, ensuring a balanced and listener-friendly podcast experience.
Channels
In this section, we delve into the crucial decision of whether to edit and publish your podcast in mono or stereo. Stereo sound is most noticeable in music whereby you can notice certain parts more in the left or right speaker or headphone. Given that the majority of podcast listeners utilize headphones, offering a robust stereo experience can significantly enhance the overall immersion and engagement for your audience.
Even if your podcast doesn’t feature music heavily, optimizing the listening experience during discussions can be achieved by employing subtle panning techniques. Distributing the recordings from each participant slightly to the left or right creates a natural spatial model for the listener. This spatial distinction allows listeners to more easily discern and follow individual contributors, even if they possess similar vocal tones.
You might be concerned that using stereo sound would significantly inflate your file size, doubling it compared to mono. However, this isn’t entirely accurate, and the increase in file size is often quite minimal. This is especially true when utilizing the “joint stereo” mode of compression. “Joint stereo” leverages channel differencing, effectively minimizing the impact on file size while maintaining the benefits of stereo sound, as previously described.
Summary
Reaper stands tall as a formidable choice for podcast creators who seek professional-grade audio production without breaking the bank. With Reaper’s versatile features and these essential tips, you can unlock the secrets to crafting captivating podcast audio. Hopefully you learned some new techniques for podcasting with Reaper and elevate your content to professional heights.
—
Header image courtesy of Techivation